Pages

Showing posts with label decoration. Show all posts

23.4.12

bag preview


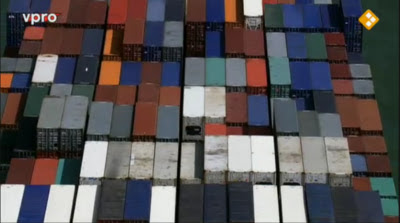
colour inspiration from documentary images of containers in a port

detail of textile painting
proven new friend

My first bag since about a year is finished! (see, i've sewn many )
Nowadays I'm happy again sewing bags because of my lovely new sewing machine. My old one (still comfortably on a corner on my working table) just couldn't sew leather which I wanted to try for a long time.
So now a shoulder bag was born today, one with leather bottom and self designed and home printed fabric on top, an adjustable strap (by poppers) from 66 cm to 125 cm, a key clip and three inner pockets, closes with a zipper, €95 excl shipping, incl VAT/BTW. You can order it here.
There's more to come as you can see in the pictures. What do think of  it?

I made a textile painting too. In my student days I used to paint a lot, now I try to make it look the same but with handprinted designs and layers of fabric and stitching.
.
.
.
And you may congratulate Tineke and her blog Stop:watch here, it's their birthday tomorrow (April 24) :-)

20.3.12

free desktop


While I was practising Photoshop techniques mixing photography and drawing I created this picture. It may not be perfect but I liked it anyway.
It's big enough to use it as a desktop (bureaublad) picture. It's free! If you like it just click on the picture and save it in your computer. Enjoy!

19.1.12

DIY small lampshade


I thought it was about time to give the poor bare lightbulb a new nice but simple lampshade for the sake of some wordly atmosphere. 
Ever since and before my Geography study I have been inspired by the graphics of maps. My attention was caught when I came across this (detail of) picture in the latest edition of Dutch magazine vtwonen; it shows a little paper bag made of a map....

picture taken from magazine vtwonen

the poor bare lightbulb in our living
So I decided to experiment on a simple lampshade out of a map of my favorite continent (being South East Asia).  I'm happy to share it with you. Of course you can use any sturdy paper you like.  
I have been succinctly so please read all descriptions and look closely at all pictures before you start. Have fun!


1.  Here are the things I thought I might be needing. You can skip the 2 round frames, I didn't use those.
So there are: 
sturdy paper, scissors, (sunflower) oil, skewers, double sided tape, colourful sewing thread and needle.


2.  Put on one side of the long end of the paper one strip of double sided tape. Peal the protective strip off and fold the paper to a long tube by putting the long ends together. If you wish a smaller lampshade you can choose to cut or tear -like I did- some of length.


3.  Cut out triangles all around the opening but first you measure the distance from centerpoint of the tube to the edge so you know how pointy the triangels have to be to close the whole top end of the tube.

4. Put small pieces of double sides tape on each triangle tip.


5.  And put all tips together to close the top end of the tube. Leave one or two slots open for the assemblage to the lightbulb.


6.  Make the paper translucent: Apply sunflower (or olive) oil to the paper by brushing carefully all over it. Give some time to let the paper suck most of the oil - check if all parts are covered by holding against the light. Then you wipe all the remaining and glossy oil with toilet paper.

 
7.  Put the paper tube to the lightbulb. and continue with the most difficult part:  you take some double sewing thread and cross stitch the open slots together. The lampshade is hanging!


 8.   You can stick 3 or 4 skewers through the paper very close to the fitting for a better fixation to the fitting. In my case the skewers even go great with the Asian continent.


Good luck and have fun!

By the way,  I found the poster (piece of wallpaper?) during our last vacation in Danmark, in Copenhagen at Grønlykke shop. Lovely isn't it? I've seen this before but don't remember the designer; does anybody know who designed it? And the little paper doll was made by my friend Megan from Frank&Gertrude.


22.12.11

Christmas interior

handmade lightballs
 
in the kitchen
 decoration with masking tape


(fimo clay) Nativity by Eva when she was 6

8.12.11

wall paper


How I love this wallpaper from Minakani.
But the fact is that I much too cowardice to apply this in my house as I tend to get bored quite quickly. I like to to repaint my wall every two years or so and doing so over this precious wallpaper is a bit like throwing money down the drain.
My living room wall has had many colours already; starting with ordinary white, then mustard, dusty pink and the present dark greenish grey lasts the longest time. The 2nd picture is from Dos Family (nice blog!)


my favorite color

28.11.11

DIY: a wee decoration


DO iT YOURSeLF
 A wee paper decoration for bare indoor branches:

1. Assemble several nice pictures from the internet and turn them into black/white pictures in Photoshop. Crop the pictures if necessary. It is not necessary to photoshop/cut the shapes from its background as I did in the first picture, as you will cut along the edges later.

2. Flip/rotate each picture horizontally - so you'll have a back and front - and save each separately naming them birdA and birdB for instance.

3. Drag the black and white pictures into one new file. Be carefull not to overlap.

4. Then print

5. Cut the shapes roughly loose and put one front and back together, hold against the light to precise the lines. Put two or three small pieces of double sided tape between the front and back. 

6. Finally you carefully cut along the edges and pinch a hole with a needle somewhere in the top of each shape to attach a piece of fishing line.

If you have difficulties with Photoshop, you may ask me to mail you a file with pictures as shown above (1st pic) 
Enjoy!